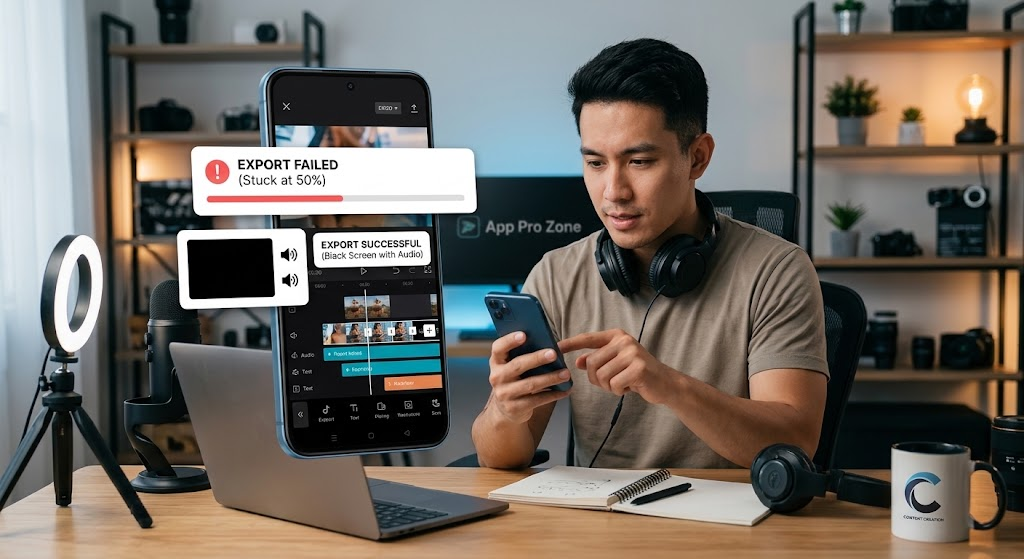
How to Fix CapCut Export Failed and Black Screen Errors on Android:
If you edit videos on CapCut for TikTok, Instagram Reels, or YouTube Shorts, chances are you’ve already run into one of two seriously annoying problems:
Your export just fails out of nowhere — stuck at 0%, 50%, or 99%.
Or the export actually finishes, but when you go to play it back, all you get is a black screen while the audio plays fine underneath.
Either way, it feels like all that time you spent trimming clips, syncing audio, and adding transitions just vanished into thin air.
Here’s the reassuring part — your project isn’t gone, and your phone isn’t broken either.
These glitches almost always come down to your processor getting overwhelmed, memory filling up, or some small storage hiccup. In this guide, we’ll go through exactly why these bugs happen and walk through the specific steps to actually fix them for good.
So Why Does CapCut Crash or Export Black Video?
Before jumping into fixes, it’s worth understanding what’s actually going on inside your phone when a render fails:
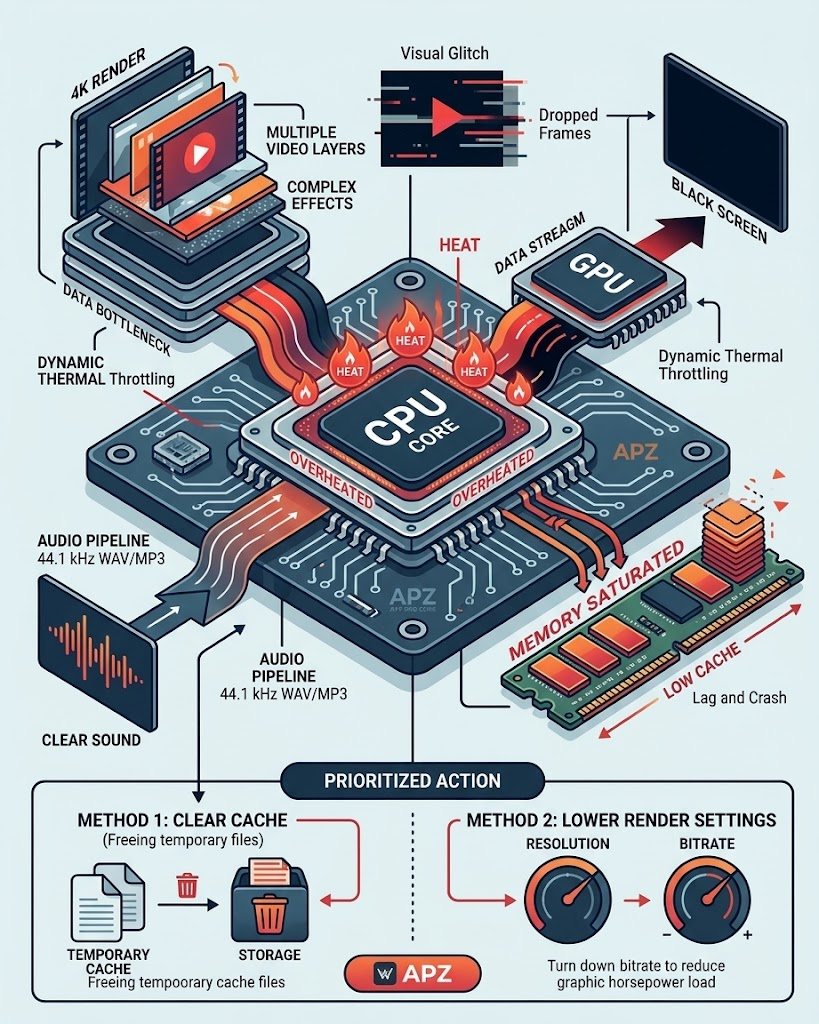
Your GPU Overheated: Rendering multiple video layers, filters, and keyframe animations takes a lot of graphics horsepower. If your phone heats up or runs low on video memory, the app just stops processing video frames to protect the hardware. Audio, on the other hand, barely uses any processing power, so it finishes exporting fine — which is exactly why you end up with a black screen but perfectly working sound.
Storage Running Low: CapCut needs temporary space to actually stitch your final video together. If your internal storage is nearly full (under 5–10GB free), the app tends to stall out, usually right near the end around 99%.
Corrupted Cache: Every time you edit, CapCut quietly saves small background files so you can preview your work smoothly. Over time these can get corrupted, and that’s often what triggers a crash mid-export.
Variable Frame Rate Issues: Phone cameras often record at a frame rate that shifts depending on lighting. When CapCut tries rendering that alongside high-res HEVC clips, it can drop frames and the export just fails.
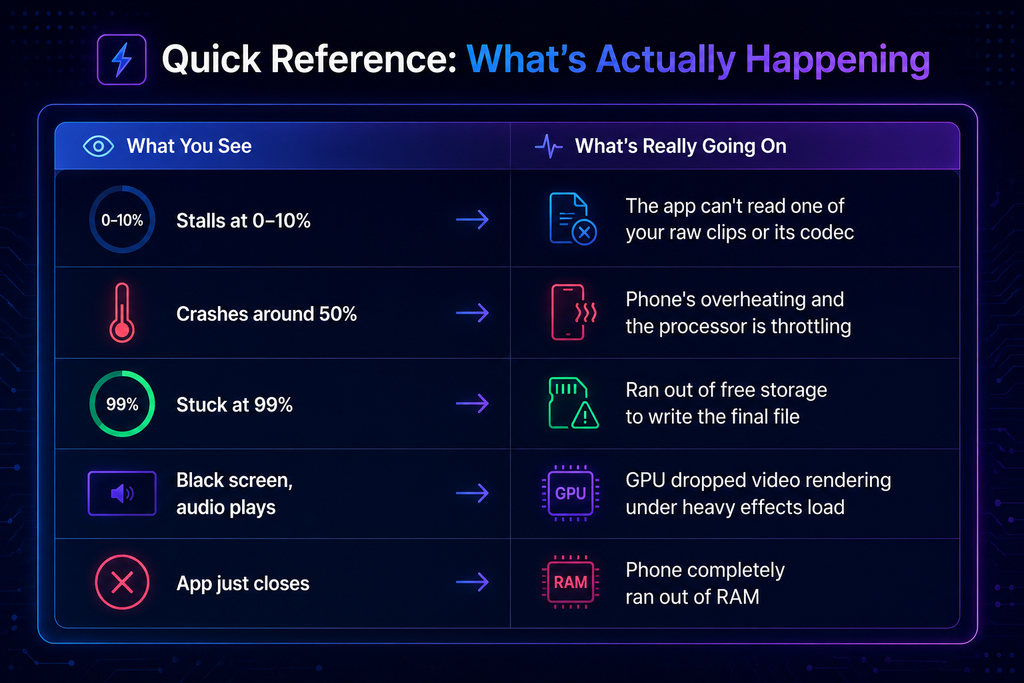
Fixing Export Failures, Step by Step:
Try these in order — usually the first one or two alone solve it.
Method 1: Clear CapCut’s Cache:
This clears out broken background files without touching your actual drafts or timeline.
Fully close CapCut (swipe it away from recent apps).
Open your phone’s Settings.
Go to Apps (or Apps & Notifications) → tap CapCut.
Tap Storage & Cache.
Tap Clear Cache.
Just a heads up — only tap Clear Cache, never Clear Data or Clear Storage. That deletes your saved draft projects entirely.
Method 2: Lower Your Export Resolution and Bitrate:
Trying to render 4K at 60 FPS on a mid-range phone is often what causes the crash in the first place. Dialing it back a bit makes a huge difference, and honestly won’t hurt how it looks on social media.
Drop resolution from 4K to 1080p.
Match your frame rate to your source footage — if you shot at 30 FPS, export at 30 FPS. Forcing it up to 60 FPS just adds unnecessary load.
Set bitrate to Recommended instead of High. Social platforms compress everything on upload anyway, so a higher bitrate just means a bigger file with no visible quality gain.
Method 3: Free Up Internal Storage:
CapCut needs a decent chunk of free space to actually build your final MP4.
Keep at least 5–10GB free before exporting anything large.
Clear out old videos from your gallery, or move finished projects to Google Drive or your PC.
Always export to internal storage first — not a microSD card, which tends to be slower and can cause its own issues.
How to Fix Aspect Ratio and Overlay Render Mismatches?
On more complex projects — think multiple overlays, stickers, text layers, and mixed aspect ratios (like combining horizontal 16:9 clips with vertical 9:16 reels) — CapCut’s canvas renderer can start freezing up. Here’s how to keep that from wrecking your export:
Lock Your Canvas Size Early: Before you add any overlays, text, or background graphics, tap Canvas in the bottom toolbar and pick your final aspect ratio — 9:16 for TikTok and Reels, or 16:9 if it’s headed to YouTube. Locking this in early stops CapCut from trying to rescale everything mid-render.
Don’t Stack Heavy Filters Over Overlays: Piling multiple heavy adjustment layers — retro noise, sharpness, dynamic color grades — directly on top of several overlays is a fast way to tank performance. A cleaner approach is to export your base background video first, re-import it, and then add your text and graphics in a second pass.
Fixing the “Black Screen With Audio” Problem:
If your export plays sound but shows nothing, here’s what usually helps:
1. Track Down and Remove a Broken Clip or Effect:
Nine times out of ten, it’s one single corrupted filter, sticker, transition, or overlay causing the whole thing.
Go back to CapCut’s home screen and duplicate the project first, just as a backup.
Open it and slowly scrub across the timeline with your finger.
Watch the preview closely — if it goes completely black at a specific point, that’s your culprit. Delete that clip or effect and add it back fresh.
2. Export in Two Passes:
If you’re working on something heavy — lots of keyframes, text overlays, layered effects — your phone might just be running out of memory trying to render it all at once.
Pass 1: Cut your main clips, add speed ramps, do your color grading, then export that as a clean 1080p baseline.
Pass 2: Start a new project, import the video you just exported, and now layer your text, keyframes, stickers, and sound effects on top of that.
Splitting the export into two lighter passes keeps your phone from choking on one massive, heavy composition.
Android Settings Worth Tweaking:
A few quick changes to your phone’s settings can give CapCut more breathing room:
Close Background Apps: Swipe away games, browser tabs, WhatsApp — anything running — before you hit export, so CapCut gets as much RAM as possible.
Turn Off Battery Saver: This mode deliberately slows your processor to save power. Turn it off so your CPU and GPU can actually run at full speed while rendering.
Take Off Your Phone Case: If your phone’s heating up during render, remove the case and let it sit on a cool surface for about 10 minutes before trying again — thermal throttling really does slow down rendering once temps climb.
Keep the Screen Awake: Set your screen timeout to Never, or just tap the corner of the screen every so often during export, so Android doesn’t put CapCut to sleep mid-render.
How to Fix CapCut Export Failed and Black Screen Errors on Android:
When editing videos on mobile devices, encountering technical issues like How to Fix CapCut Export Failed and Black Screen Errors on Android can instantly derail your creative workflow. Understanding the underlying system causes behind How to Fix CapCut Export Failed and Black Screen Errors on Android helps creators resolve rendering freezes without losing project progress. If you frequently face app crashes during rendering, learning How to Fix CapCut Export Failed and Black Screen Errors on Android gives you total control over hardware performance and cache management. Many mobile video editors spend hours searching for solutions on How to Fix CapCut Export Failed and Black Screen Errors on Android when their high-resolution timelines fail to process. In mobile post-production, applying proper steps for How to Fix CapCut Export Failed and Black Screen Errors on Android ensures your final video files render cleanly every time. Smartphone creators often discover that How to Fix CapCut Export Failed and Black Screen Errors on Android resolves sudden playback glitches across complex timeline clips.
When dealing with low available storage or overloaded RAM memory, implementing How to Fix CapCut Export Failed and Black Screen Errors on Android provides immediate performance relief for your device. Editors who regularly study How to Fix CapCut Export Failed and Black Screen Errors on Android learn how clearing app cache prevents corrupt cache buildup during export runs. Dedicating time to How to Fix CapCut Export Failed and Black Screen Errors on Android helps you understand how frame rate adjustments and code mismatching affect rendering stability. If you produce daily TikTok reels or gaming montages, mastering How to Fix CapCut Export Failed and Black Screen Errors on Android keeps your channel upload schedule running on time. Content creators frequently share advice on How to Fix CapCut Export Failed and Black Screen Errors on Android across active video editing community forums.
Analyzing hardware decoding limits reveals why knowing How to Fix CapCut Export Failed and Black Screen Errors on Android is so vital for Android smartphone users. By testing methods on How to Fix CapCut Export Failed and Black Screen Errors on Android, you learn how toggling hardware acceleration settings stabilizes output rendering. Mobile editors often search for How to Fix CapCut Export Failed and Black Screen Errors on Android because unexpected blank preview screens hinder precise timeline cutting. Applying effective steps for How to Fix CapCut Export Failed and Black Screen Errors on Android creates a smooth environment for heavy video overlays and speed ramps. Every viral video editor relies on How to Fix CapCut Export Failed and Black Screen Errors on Android to troubleshoot corrupt project assets and glitched clips.
When dealing with 4K resolution exports on mid-range phones, How to Fix CapCut Export Failed and Black Screen Errors on Android ensures that lowering output bitrates restores successful file saving. Smartphone editing enthusiasts agree that How to Fix CapCut Export Failed and Black Screen Errors on Android bridges the gap between hardware limitations and heavy visual processing. Understanding background app refresh restrictions during How to Fix CapCut Export Failed and Black Screen Errors on Android prevents unexpected app force-closes during long renders. If you want your video projects to export cleanly, How to Fix CapCut Export Failed and Black Screen Errors on Android requires careful attention to media codec formats. Creators using older device models find that How to Fix CapCut Export Failed and Black Screen Errors on Android turns failing timeline projects into published videos.
Exploring graphics driver compatibility while testing How to Fix CapCut Export Failed and Black Screen Errors on Android adds long-term stability to your editing workspace. As you spend more time learning How to Fix CapCut Export Failed and Black Screen Errors on Android, managing device temperature and thermal throttling becomes second nature. Many troubleshooting tutorials focusing on How to Fix CapCut Export Failed and Black Screen Errors on Android stress the importance of updating your mobile operating system regularly. Combining media format conversions with How to Fix CapCut Export Failed and Black Screen Errors on Android allows vloggers to bypass corrupt media files seamlessly. The technical flexibility provided by How to Fix CapCut Export Failed and Black Screen Errors on Android makes it a vital guide for mobile creators.
When editing multi-layer video tracks, applying How to Fix CapCut Export Failed and Black Screen Errors on Android allows you to identify corrupted overlay elements effortlessly. Tech-savvy creators recommend How to Fix CapCut Export Failed and Black Screen Errors on Android because optimizing device RAM usage significantly increases rendering success rates. Learning how background permission settings work during How to Fix CapCut Export Failed and Black Screen Errors on Android prevents Android system battery savers from killing export tasks. Editors working on client work often bookmark How to Fix CapCut Export Failed and Black Screen Errors on Android for quick reference during urgent delivery deadlines. Fine-tuning project canvas resolution settings while exploring How to Fix CapCut Export Failed and Black Screen Errors on Android gives your output files consistent structural stability.
Understanding cache directory cleanup alongside How to Fix CapCut Export Failed and Black Screen Errors on Android allows editors to free up gigabytes of temporary junk files. Every experienced mobile editor knows that How to Fix CapCut Export Failed and Black Screen Errors on Android requires systematic checking, especially when dealing with heavy speed curves. Exploring frame rate lowering techniques during How to Fix CapCut Export Failed and Black Screen Errors on Android opens up reliable options for older chipset processors. Creators who take time to learn How to Fix CapCut Export Failed and Black Screen Errors on Android consistently avoid lost work and corrupted project files. Mastering storage path management through How to Fix CapCut Export Failed and Black Screen Errors on Android eliminates saving errors caused by restricted folder access.
Applying proper device reboot procedures during How to Fix CapCut Export Failed and Black Screen Errors on Android provides full refresh capacity to system resources. Content creators across various platforms rely on How to Fix CapCut Export Failed and Black Screen Errors on Android to keep their mobile production workflow operating smoothly. Practicing timeline optimization while studying How to Fix CapCut Export Failed and Black Screen Errors on Android prevents frame dropping between complex clip transitions. As mobile editing applications receive frequent updates, How to Fix CapCut Export Failed and Black Screen Errors on Android remains an essential troubleshooting topic for video editors. The difference between an abandoned project and a published video often comes down to how effectively you apply How to Fix CapCut Export Failed and Black Screen Errors on Android.
Using proxy editing tricks during How to Fix CapCut Export Failed and Black Screen Errors on Android gives heavy timeline clips smooth preview playback without crashing. Editors working on long vlogs find that How to Fix CapCut Export Failed and Black Screen Errors on Android allows them to bypass export stalls at ninety percent. Learning to isolate broken video effects while reviewing How to Fix CapCut Export Failed and Black Screen Errors on Android ensures that visual glitches land nowhere near your final export. The simple execution of How to Fix CapCut Export Failed and Black Screen Errors on Android allows for uninterrupted video creation. In conclusion, How to Fix CapCut Export Failed and Black Screen Errors on Android transforms frustrating technical roadblocks into manageable, quick fixes.
Investing time into How to Fix CapCut Export Failed and Black Screen Errors on Android pays off immediately by making your editing process stress-free and reliable. Whether you edit travel vlogs, sports clips, or YouTube Shorts, How to Fix CapCut Export Failed and Black Screen Errors on Android gives you the knowledge needed for smooth mobile rendering. Every creator committed to maintaining high video output should include How to Fix CapCut Export Failed and Black Screen Errors on Android in their technical knowledge base. By consistently applying How to Fix CapCut Export Failed and Black Screen Errors on Android, you ensure your media projects always render successfully. Ultimately, How to Fix CapCut Export Failed and Black Screen Errors on Android empowers you to complete complex video edits with total confidence.
Check for Corrupted Audio Tracks and Music Files:
It’s easy to assume export failures are always about heavy video files, but honestly, corrupted or non-standard audio can cause just as much trouble. A damaged .mp3 background track, a voiceover recorded at an odd sample rate (anything under 44.1 kHz), or an encrypted file can quietly crash the final MP4 creation process right around 98–99%.
Re-encode Problem Audio: If your export keeps stalling near the end, run your background music or voiceover through a free online audio converter first — turn it into a standard 320 kbps MP3 or 44.1 kHz WAV before dropping it back into your project.
Trim Long Audio Before You Start Editing: Don’t just drag a full 10-minute audio file into a 30-second video project. Trim it down roughly to match your video’s length before you even bring it into CapCut’s timeline.
Frequently Asked Questions:
Will clearing the cache delete my drafts?
No — clearing cache only removes temporary preview files. Your drafts, edits, and clips stay exactly where they are. It’s only uninstalling the app or clearing Data that wipes your local drafts.
Why does my export always freeze right at 99%?
That almost always means CapCut finished processing the actual video frames but ran out of space while writing the final .mp4 container. Freeing up around 5GB usually fixes it instantly.
Should I export in 4K or 1080p for TikTok/Instagram?
Honestly, 1080p at 60 FPS tends to look better on these platforms. They compress 4K uploads pretty aggressively, which can actually leave the video looking blurrier. A clean 1080p export keeps the file size reasonable and holds up better after compression.
Why Is CapCut Crashing or Exporting Black Videos?
Video Format Conflicts (Hardware Decoder Getting Overwhelmed): CapCut leans heavily on your phone’s processor to play back and stitch together video tracks in real time. The problem is, when you mix footage from different sources — say, a screen recording, some downloaded stock clips, gameplay footage, and stuff shot directly on your phone camera — their formats often don’t play nicely together. When CapCut tries to process all these mismatched files at once, your phone’s hardware decoder basically gets overloaded, and the app ends up dropping frames or just stopping the render altogether mid-export.
Final Thoughts:
Fixing CapCut export issues on Android really comes down to a few basics — keeping your phone cool, managing RAM properly, holding onto at least 10GB of free storage, and rendering at more balanced settings like 1080p instead of pushing for 4K every time. Stick to the steps in this guide and you should be able to get rid of black screen glitches and render your edits reliably, every time.
