Video Editting By Muhammad Umair Khalid:

Muhammad Umair Khalid is a bioinformatics student at Muhammad Nawaz Sharif University of Agriculture in Multan, Pakistan, and he’s the one behind this entire platform — bringing together a solid scientific academic background with a genuine passion for digital media production, professional video editing, and technical web publishing. Whether he’s fine-tuning site architecture to handle high traffic, building out complex mobile editing workflows, or putting together viral short-form videos under his various creative aliases, everything he writes here comes from actual hands-on, trial-and-error testing. This platform is really the direct result of all that work — built to hand fellow creators the exact technical know-how they need to actually succeed in today’s digital landscape.
The Ultimate Mobile Content Creation & Video Editing Hub:
Welcome to what’s meant to be the go-to resource for modern mobile filmmakers, content creators, and digital storytellers. At a point where smartphone cameras are genuinely rivaling dedicated DSLRs, getting good at mobile post-production isn’t optional anymore — it’s basically the foundation for building any kind of digital audience. Whether you’re putting together high-energy TikTok edits, dynamic YouTube Shorts, viral Reels, or client-facing video presentations, this platform is built around detailed guides, real troubleshooting help, and step-by-step tutorials meant to help you squeeze the most out of your mobile editing setup.
How Mobile Post-Production Has Changed:
Not that long ago, editing high-resolution video meant you needed a multi-thousand-dollar desktop rig, expensive software licenses, and a good chunk of setup time before you could even start. These days, the processing power sitting inside mid-range and flagship phones lets creators pull off proper color grading, keyframe animation, velocity speed ramping, and layered compositing right from their hand.
The speed at which mobile hardware has advanced — optimized graphics chips, dedicated neural processing units, fast flash storage — has genuinely changed how media gets made and consumed. Mobile editors aren’t stuck with basic trimming anymore. Apps like CapCut now offer desktop-level functionality that closes the gap between a quick casual edit and actual studio-level motion design.
Why Mobile-First Editing Actually Matters:
Real portability: you can film, edit, render, and publish quality video from wherever you are, without needing to sit at a desk.
Instant platform-ready exports: publish straight to short-form platforms in native vertical (9:16) format without extra conversion steps.
Touch-based control: manipulating keyframe paths, timeline nodes, and speed curves directly with your fingers gives editing a tactile, responsive feel that’s genuinely different from a mouse and keyboard.
Cost-effective: get professional-looking results using accessible mobile apps, without needing to invest heavily upfront.
The Core Areas This Platform Covers:
To help you navigate everything happening in mobile video production right now, the content here is organized around a few key areas — covering everything from the basics of motion to fixing the more frustrating system crashes. Here’s what we focus on:
Pillar 1: Advanced Motion Graphics and Keyframe Animation:
At the core of any good video edit is how well the keyframes are placed. Static graphics, lifeless text overlays, and stiff camera movement are usually what make a project look amateur. Getting comfortable with keyframe animation means you can control position, scale, rotation, and opacity over time — which is what gives motion graphics that organic, fluid look.
Understanding how interpolation works, spatially and over time: when you drop two keyframes on a timeline, the software has to figure out how that object moves from point A to point B. Plain linear movement tends to look robotic and artificial. Applying custom easing — ease-in, ease-out, or more complex curves — is what introduces natural-feeling physics into the motion.
Ease-in curves: let an object gradually build speed, similar to how real objects behave under inertia.
Ease-out curves: bring a moving element to a smooth stop as it reaches its final position.
Anchor point alignment: getting the pivot point positioned correctly so rotation and zoom actually originate from the right spot.
Multi-layer syncing: lining up keyframes across several video and graphics layers to build cohesive, more complex transitions.
Our tutorials break all of this down to exact graph values, frame-by-frame adjustments, and pacing tips, so you can consistently pull off clean keyframe animation right from your phone.
Pillar 2: Velocity Speed Ramping and Slow-Motion Precision:
Velocity editing has basically become a dominant style across social feeds at this point — especially in gaming montages, fashion content, travel vlogs, and action sports highlights. The real secret behind a smooth velocity edit is controlling variable speed curves instead of just applying one flat speed change.
Getting that Optical Flow smoothness: slowing down standard 30 FPS footage usually results in stuttering, choppy playback. To get that clean, buttery slow-motion look, you need to understand how capture frame rate and rendering interpolation actually relate to each other.
Shoot at a high frame rate: always capture action footage at 60 FPS, 120 FPS, or higher, so there’s enough actual frame data available once you stretch it into slow motion.
Bend your speed curves: instead of dropping speed abruptly, use curve handles to ease from fast playback (200%+) down into slow motion (10–30%) smoothly.
Use Optical Flow frame generation: let AI-assisted interpolation generate the in-between frames artificially, which gets rid of that visual judder during heavy slow-motion sections.
Match your keyframes to the beat: line up your fastest speed transitions with heavy bass hits or transients in the audio for the biggest visual impact.
Our velocity guides go into exactly how to map your speed handles to specific audio cues, build your own speed presets, and keep footage sharp even through intense speed ramps.
Pillar 3: Technical Troubleshooting and Mobile Performance:
Nothing kills a creative flow faster than an export failing out of nowhere, a blank preview screen, or the whole app freezing on you. Modern mobile editing apps push device hardware close to its limit, which makes performance management a genuinely essential skill for anyone editing on mobile.
Common problems and practical fixes:
1. Exports Failing Near the End:
Exports stalling — often somewhere around 90% or higher — usually comes down to corrupted timeline cache, mismatched codecs, or the device simply running low on memory.
Manage memory: close any heavy background apps before starting a complex export.
Clean your cache: clear out temporary cache files in your editor’s settings regularly to get rid of broken pre-render data.
Adjust bitrate: dropping the export bitrate slightly cuts down memory overhead without any noticeable quality loss.
2. The Black Screen Bug Everyone Hits Eventually:
A black screen on export usually points to hardware decoding being overloaded, or a corrupted media file path somewhere in the project.
Isolate your layers: mute or hide tracks one at a time to figure out exactly which overlay or effect is causing the issue.
Toggle hardware acceleration: turning GPU decoding on or off in your app’s settings can help you test what your chipset actually handles well.
Use a proxy workflow: convert heavy 4K footage into lighter 1080p proxies while editing, then swap the originals back in right before your final export.
3. Thermal Throttling and Dropped Frames:
Once a phone’s processor crosses its safe temperature range, the system automatically limits CPU and GPU performance — which is exactly what causes timeline lag and dropped frames.
Edit somewhere cool, and avoid charging your phone while rendering anything heavy.
Break big projects into smaller chunks, render each piece separately, then assemble the final cut afterward.
Pillar 4: Software Comparisons and Platform Ecosystems:
Which editing app actually makes sense for you depends a lot on what you’re making, what your hardware can handle, and how you personally like to edit. Our comparisons are meant to take the guesswork out of that — looking at the popular mobile and desktop options across a bunch of different criteria so you can actually make an informed choice.
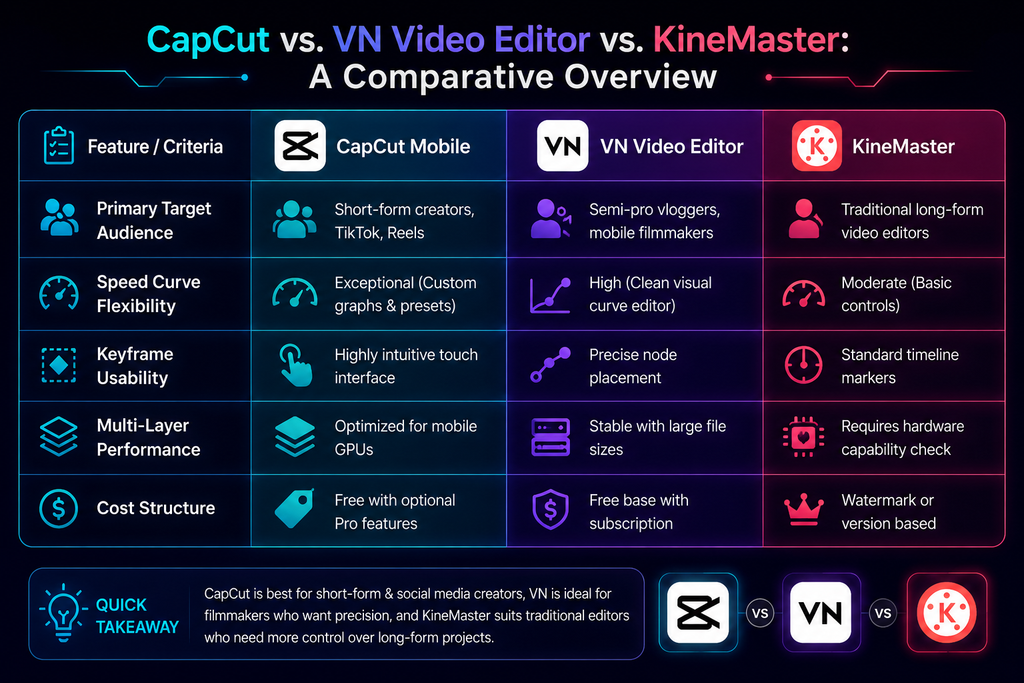
By looking closely at user interfaces, rendering efficiency, and how deep each app’s effect library actually goes, our comparison reviews are meant to help you pick the editing environment that genuinely fits how you work.
Detailed Step-by-Step Workflow: From Raw Footage to Final Render
If you want consistent results in mobile video creation, having an actual disciplined post-production routine matters a lot. Below is roughly the same framework top creators use to consistently put out clean, high-performing video content.
[ Step 1: Media Organization ]
             │
             ▼
[ Step 2: Assembly Cut & Trimming ]
             │
             ▼
[ Step 3: Audio Syncing & Beat Marking ]
             │
             ▼
[ Step 4: Keyframing & Velocity Curves ]
             │
             ▼
[ Step 5: Color Grading & Visual Effects ]
             │
             ▼
[ Step 6: Final Optimization & Render ]
Step 1: Getting Your Media Organized:
Before you even drop a single clip onto the timeline, get all your raw footage, audio tracks, sound effects, and overlay graphics imported into proper project folders. Staying on top of this early on saves you from missing-file errors later and genuinely cuts down on total editing time.
Step 2: The Assembly Cut:
Bring your main footage onto the timeline and do a rough trim — cut out dead air, awkward pauses, anything out of focus. At this stage, just focus on the narrative and pacing. Don’t worry about effects yet; that comes later.
Step 3: Syncing Audio and Marking Beats:
Audio is honestly half the experience of watching a video. Bring in your background track and manually drop beat markers along the waveform. Line up your main scene cuts and transitions with those beats — that’s what gives an edit its rhythm and makes it satisfying to watch.
Step 4: Adding Motion:
This is where you bring in keyframe animation — zooming into important details, layering in picture-in-picture graphics, and smoothing transitions with custom velocity curves. Just make sure every motion effect you add is actually serving a purpose, not just there for the sake of it.
Step 5: Color Correction and Polish:
Adjust your basic exposure, contrast, highlights, and shadows so everything looks consistent across different shots. Apply a color LUT or some subtle grading here too — this is really what gives your channel its own distinct visual identity over time.
Step 6: Rendering and Final Checks:
Pick your resolution (usually 1080p or 4K), match your frame rate to whatever your source footage was shot at (30 or 60 FPS), and export. Always go back and watch the finished file on a couple of different screens before publishing — check for audio clipping, visual glitches, or anything timing-related that slipped through.
Tips for Keeping Your Audience Actually Watching:
Making something that looks good is only half the battle — your edit also has to hold attention in a feed where people scroll fast. Here are a few things that genuinely help with retention:
The hook (first 3 seconds): grab attention right away with fast motion, punchy sound design, and something visually interesting up front — you don’t get a second chance at this part.
Text animation and captions: over 70% of short-form video gets watched with the sound off, so clean animated subtitles with a background color that actually contrasts well keep passive viewers engaged.
Layered sound design: mix in ambient background audio, mechanical sound effects (swooshes, pops, risers), and music together — that’s what makes an edit feel immersive instead of flat.
Visual pattern interrupts: small zoom-ins, quick color flashes, or graphic pop-ups every 2–4 seconds keep the viewer’s eyes active and stop the video from feeling visually monotonous.
Keep your framing clean: make sure important text and visuals stay within the “safe zones” of the screen, away from where platform UI — share buttons, comments, profile icons — tends to sit.
Frequently Asked Questions:
What’s the best resolution for editing on mobile?
For short-form platforms like TikTok, Reels, and Shorts, editing and rendering at 1080p (1080×1920) at 60 FPS is really the sweet spot between clarity and file size. 4K looks sharp on its own, sure, but a lot of these platforms compress 4K uploads pretty heavily on their end — sometimes hard enough that it actually looks worse than a well-optimized 1080p export.
How do I fix lag when editing 4K footage on a mid-range phone?
If your timeline is stuttering while previewing 4K clips, try lowering the preview resolution in your app’s settings if it supports that, close any background apps, or convert your source clips into 1080p proxies while you edit. Once your cuts and keyframes are locked in, swap the original 4K files back in before you render.
Why does my slow-motion footage look blurry or stuttery?
That stutter shows up when you slow down a clip that was recorded at a standard frame rate like 24 or 30 FPS. The fix is to record anything meant for slow motion at 60 or 120 FPS to begin with. If you’re stuck slowing down regular footage after the fact, use an editor with AI Optical Flow to generate the missing frames automatically.
How do I avoid copyright strikes when adding music?
Stick to royalty-free tracks from official platform audio libraries, dedicated creative commons sites, or subscription audio services. Avoid dropping commercial tracks straight into your uploads unless you’ve actually got licensing for it, or you’re using the platform’s own built-in music picker.
Unlocking What Mobile Editing Can Actually Do:
Mobile video editing isn’t some temporary workaround anymore — it’s become a real, powerful medium capable of producing genuinely world-class content. Combine solid keyframe control, smooth velocity timing, disciplined media organization, and staying ahead of hardware issues, and your phone basically becomes a complete post-production studio in your pocket.
Take a look through our other articles, deep-dive tutorials, and technical guides to keep sharpening your skills. Whether you’re chasing down a rendering bug or trying to master a complex effect, this platform’s here to help you through every stage of making content.